
This post may contain affiliate links. If you purchase through these links, we may earn a small commission at no extra cost to you. These commissions help us maintain our website, conduct in-depth research, and provide expert insights to help you make informed decisions.
Keeping your air ionizer in top shape starts with regular air ionizer filter replacement. A clean filter ensures your purifier effectively removes dust, allergens, and pollutants, helping you breathe fresher air every day. The good news? Changing the filter is quick and hassle-free when you follow the right steps.
Let me walk you through the simplest way to replace your air ionizer filter, so you can keep your indoor air clean without any stress. Whether you’re doing this for the first time or need a refresher, this guide will make the process smooth and easy!
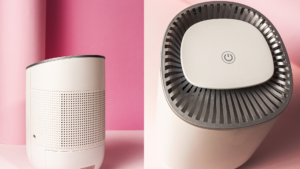
A quick and easy way for Air Ionizer Filter Replacement
Let me tell you—changing the filter on your Fresh Air Ionizer is easier than you think! Regular filter replacement helps remove dust, pollen, and other pollutants, ensuring your home stays fresh and clean. If you’ve never done it before, don’t worry! I’ll walk you through the steps so you can get it done quickly and safely.
Step 1: Prepare for the Filter Change
Before you start, gather everything you need:
✔️ A replacement filter (Check your manual for the right type)
✔️ Protective gloves (To avoid touching dust and contaminants)
✔️ A soft cloth or vacuum (To clean around the filter compartment)
🔌 Important! Make sure to turn off and unplug your ionizer before opening it. This prevents electrical accidents and keeps you safe.
Take a moment to locate the filter compartment. If you’re unsure, check the user manual or look for a panel on the back or side of the device.
Step 2: Remove and Replace the Filter
Now, let’s swap out that old filter!
🛠 Follow these steps:
1️⃣ Open the filter compartment – This might require unscrewing a panel or simply sliding it open.
2️⃣ Remove the old filter – Be gentle, as it may be coated in dust and allergens.
3️⃣ Clean the area – Use a vacuum or cloth to wipe away dust inside the compartment.
4️⃣ Insert the new filter – Make sure it’s facing the right way. Some filters have arrows indicating the correct placement.
Step 3: Test and Reset the Ionizer
Now that your new filter is in place, it’s time to power up and check if everything is working.
✔️ Plug in and turn on the ionizer.
✔️ Check for airflow – Fresh air should start flowing smoothly.
✔️ Look for any warning lights – If your ionizer has a filter replacement indicator, reset it following the manufacturer’s instructions.
Maintenance Tips For Prolonging Filter Life
Let me tell you—a little maintenance goes a long way when it comes to keeping your Fresh Air Ionizer working at its best. If you want cleaner air and a longer-lasting filter, you’ll need to give it some regular care. Luckily, it’s quick and easy to do!
Step 1: Keep Your Filter Clean
Over time, dust and debris can clog the filter, making your ionizer less effective. From my experience, the best way to keep your filter fresh is to clean it regularly. Here’s how:
✔️ Vacuum the filter gently – Use a soft brush attachment to remove dust buildup.
✔️ Use compressed air – A quick blast of air can dislodge trapped particles.
✔️ Wash with mild soap and water – Every few months, rinse the filter gently to remove stubborn dirt.
✔️ Let it dry completely – Never put a damp filter back into your ionizer!
Step 2: Check for Wear and Tear
Even with regular cleaning, filters don’t last forever. That’s why I always recommend checking the filter often for signs of damage:
🔍 Look for holes, tears, or thinning material.
🛑 If the filter isn’t trapping dust well, it’s time for a replacement.
Pro tip: Set a reminder to inspect your filter every month. That way, you’ll know when it needs cleaning or replacing before it affects your air quality.
Step 3: Keep Your Ionizer Running Efficiently
Besides cleaning the filter, there are a few extra steps you can take to keep your ionizer in top shape:
✔️ Place it in a clean, dust-free area – Avoid putting it near windows or vents where it might collect extra debris.
✔️ Wipe down the exterior regularly – A quick dusting can prevent buildup around vents.
✔️ Follow the manufacturer’s maintenance schedule – Every model is different, so check the manual for any specific care tips.
et me tell you—changing the filter on a fresh air ionizer should be simple, but sometimes things don’t go as planned. I’ve been there! From filters that don’t fit to stubborn filters that won’t budge, I know how frustrating it can be. But don’t worry—I’ve got some easy fixes to help you troubleshoot these issues.
Common Problems and How to Fix Them
🚧 Problem: The Filter Doesn’t Fit
This is one of the most common frustrations people face when replacing a filter. If your new filter won’t fit properly, here’s what to do:
✔️ Double-check the size – Compare the filter’s dimensions with the manufacturer’s specifications. Even a small mismatch can cause issues.
✔️ Ensure it’s the right model – Some air purifiers only accept specific filter types. If you’re unsure, look up compatible filters in the user manual or the manufacturer’s website.
✔️ Contact customer support – If the filter still doesn’t fit, reach out to the manufacturer for guidance. They may offer a replacement or recommend an alternative.
🛠 Problem: The Filter Is Hard to Remove or Install
Sometimes, filters get stuck or feel tricky to place correctly. If you’re struggling:
✔️ Check for locking mechanisms – Some models have latches or clips that need to be released first.
✔️ Use gentle but firm pressure – Don’t force it! Instead, wiggle the filter gently to loosen it before pulling it out.
✔️ Refer to the manual – Every ionizer is different, so follow the step-by-step instructions provided by the manufacturer.
By following these tips, you’ll save yourself the frustration and make the filter replacement process quick and easy!
How to Identify the Right Filter for Your Fresh Air Ionizer
Choosing the right filter is just as important as changing it regularly. I always recommend doing a little research before buying a replacement—it can save you time, money, and headaches!
🔍 Step 1: Find Compatible Filter Options
Not all filters work with every ionizer, so here’s how to find the right one:
✔️ Check the product manual – Most manufacturers list compatible filter models in the manual.
✔️ Visit the manufacturer’s website – If you lost the manual, you can often search by model number online.
✔️ Look at the old filter – Some filters have part numbers printed on them, making it easy to find an exact match.
🛑 Step 2: Understand Different Filter Types
Air purifiers use different kinds of filters, and each one serves a unique purpose:
✔️ HEPA Filters – Best for removing dust, pollen, pet dander, and allergens. If you have allergies, this is the way to go.
✔️ Activated Carbon Filters – Great for absorbing odors and trapping VOCs from household products. If you want to remove smells, this is your best bet.
✔️ Combination Filters – Some purifiers use multiple filter types to provide a well-rounded air cleaning experience.
By understanding what each filter does, you can choose the best option to keep your indoor air clean and fresh.
Enjoy Cleaner Air!
That’s it! In just a few simple steps, you’ve ensured your Fresh Air Ionizer keeps delivering clean, purified air. I recommend setting a reminder to check your filter every few months—staying on top of maintenance means better air quality and a longer-lasting device.
Now, sit back, breathe easy, and enjoy your fresh, clean space!